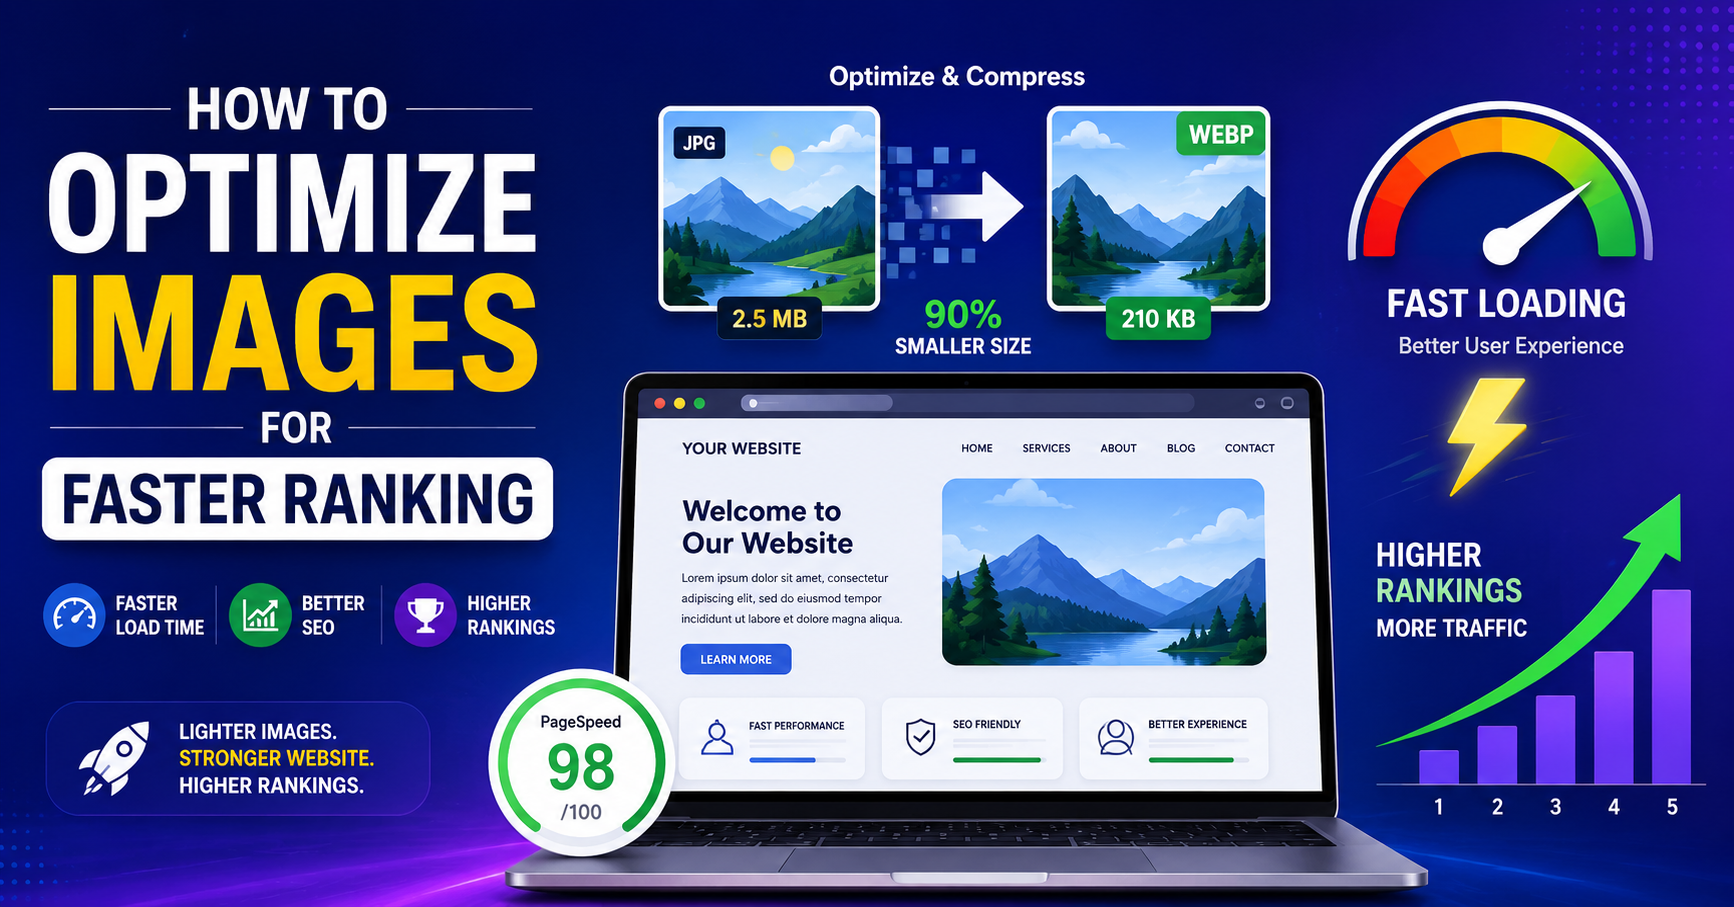
Why Image SEO Matters for Rankings
Images do much more than “make a page pretty.” When they are properly optimized, they:
The first method improves page speed which search engines use to determine website rankings.
The second method enables users to access Google Images and visual search results which display their content.
This guide presents image SEO techniques which you can implement on any site to achieve faster ranking results and enhanced user experience.
Step 1: Choose the Right Images (Relevance First)
Search engines achieve improved image comprehension through their advancements yet they still depend on contextual information. Your first optimization step starts before upload.
Use relevant images that clearly support the topic of the page (e.g., a screenshot of an image compression tool in a blog about image SEO, not a generic stock photo).
The choice of original images (screenshots, product photos, custom graphics) should be preferred because they demonstrate actual experience which leads to better link acquisition and public interaction.
Quick example:
Your blog about “image alt text best practices” should use screenshots which show alt text fields located in WordPress or Shopify instead of displaying random office scenes.
Step 2: Choose the Best File Format (JPG vs PNG vs WebP vs SVG)
The right format balances quality and speed.
JPG/JPEG: Best for photographs and complex images with many colors. The format provides smaller file size which results in acceptable quality.
PNG: Best for images that need transparency or crisp lines (logos, UI elements, icons). JPG files typically have smaller size compared to PNG files.
WebP/AVIF: Modern formats that often deliver much smaller file sizes at similar or better quality. Most images should use these formats but your CMS and hosting must provide support.
SVG: Vector-based logos and icons should use this format because it allows users to scale images without losing quality.
Practical workflow:
- Photos: export as WebP or JPG.
- Logos and icons: SVG or PNG.
The CMS system needs to convert all uploaded files to WebP automatically while maintaining backward compatibility with older browser versions.
Step 3: Resize Images to the Actual Display Size
The most common image SEO mistake occurs when users upload a 4000px-wide photo which displays at 800px in their content.
You need to identify your theme’s maximum content width which most blogs use as their maximum content width of 800 to 1200 pixels.
The image dimensions should be resized before uploading to match or slightly exceed the maximum width requirement which does not require 4000 pixels.
The minimum width requirement for hero banners or full-width background images starts at 1600 pixels but users should avoid exceeding this limit.
Example workflow (WordPress):
- Check your theme’s content width (e.g., 1200px).
- Open the image in a tool like Photoshop, GIMP, Figma, or an online editor.
- The width should be changed to 1200 pixels while keeping the aspect ratio.
- Export as WebP or JPG with “high” but not “maximum” quality.
This process reduces file size by 50 to 80 which results in significant improvements to page loading speed.
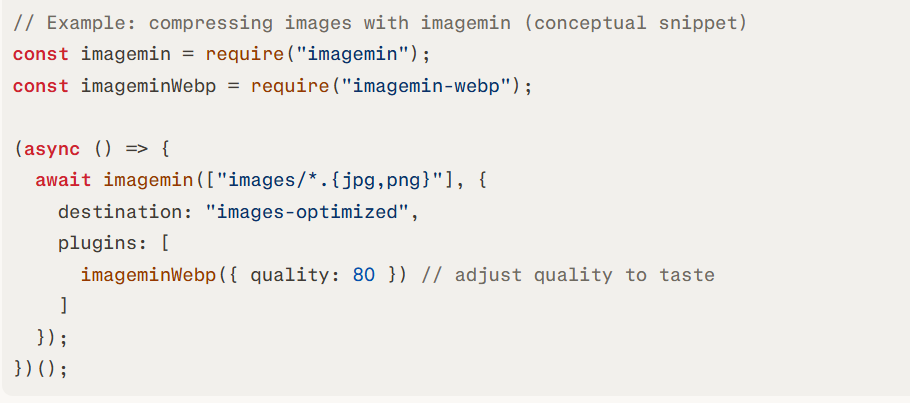
Step 4: Compress Images Without Losing Visible Quality
Images maintain excess weight after resizing because their current size exceeds necessary limits. Compression processes decrease file size while keeping visual quality intact.
You can compress images:
Before upload using tools like TinyPNG, TinyJPG, Squoosh, or desktop apps.
The WordPress plugins and other CMS image optimization tools provide automatic image compression for all uploaded content.
Practical guidelines:
- Blog images: aim for under 100 KB when possible, especially for images inside the content.
- Large hero images: sometimes 150–300 KB is acceptable if they’re critical visuals, but optimize as much as you can.
The original image should be compared with the compressed version to establish whether any visual degradation has occurred.
Pseudo-code snippet for automated compression in a Node.js workflow
Step 5: Use SEO-Friendly File Names
Search engines read the image filename as a signal. Do not use common file names which include the string IMG_1234.jpg.
Bad file names:
- The file name IMG_00123.jpg does not follow proper naming conventions.
- The file name screenshot-final-FINAL.png does not follow proper naming conventions.
Good file names:
- The file name image-seo-alt-text-example.webp describes its content.
- The file name wordpress-media-library-alt-text-field.png describes its content.
- The file name blue-running-shoes-side-view.jpg describes its content.
Best practices:
You should use lowercase letters while creating file names which require hyphens to separate words without including any spaces.
Use natural language to explain the image content while avoiding keyword stuffing for all other images.
You should maintain descriptive file names which provide essential details while keeping their length short.
Step 6: Write Descriptive, Accessible Alt Text
Alt text (alternative text) functions as an essential element for:
- Accessibility (people with visual impairments use screen readers to access this content).
- Search engines need this information to identify what the particular image depicts.
- Google Images and visual search results depend on this process for their operations.
How to write effective alt text:
Describe the image content to the audience and explain its connection to the page content.
You should keep your content brief while maintaining natural flow between 10 and 15 words.
The primary keyword should be used only if it naturally fits into the content of the description.
The terms “image of” and “picture of” should not be included because they create unnecessary repetition.
Examples:
- Weak alt text: “SEO”, “image1”, “blog graphic”
- Strong alt text: “Screenshot of WordPress media library showing alt text field for image SEO”
The product description includes a black leather crossbody bag with a gold chain strap which rests on a wooden table.
You should leave the alt text field empty for decorative images which function as dividers or background elements (alt=””) so that assistive technologies will not detect these elements.
Step 7: Add Helpful Captions and Surrounding Text
Captions are optional, but when used correctly, they:
- The captions establish the image location within the surrounding context.
- The captions offer another chance to clarify the visual content of the image.
- The most-read sections of a page usually include the content that people see first.
You should use captions when:
The image shows important information through its visual elements (example: a chart or before/after image or interface screenshot).
The caption provides essential information which helps to understand the visual content.
Example caption for an image compression screenshot:
The process of compressing a WebP image resulted in a size reduction from 420 KB to 78 KB while maintaining its original visual quality.
You need to analyze the text which exists around the image (heading above it, paragraph below it). The section which discusses image compression for SEO should use that exact phrase throughout its surrounding content.
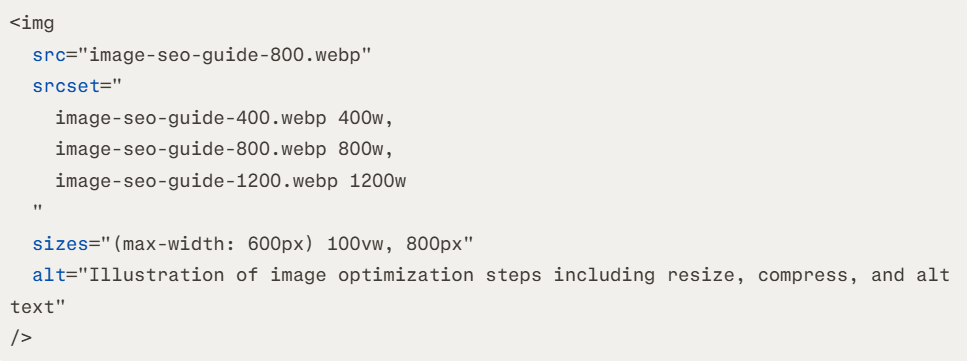
Step 8: Implement Responsive Images (srcset and sizes)
Responsive images prevent mobile users from downloading desktop-sized files which results in significant speed improvements.
Modern CMSs like WordPress automatically generate multiple image sizes and serve them using srcset. The system allows you to create templates which you can program to include responsive attributes.
Example HTML Snippet
Step 9: Use Lazy Loading for Below-the-Fold Images
The process of lazy loading stops the loading process for below-the-fold images until users scroll to their location. The method enhances two aspects of performance:
The method enhances two aspects of performance:
Most modern platforms support lazy loading natively:
In raw HTML, simply use:

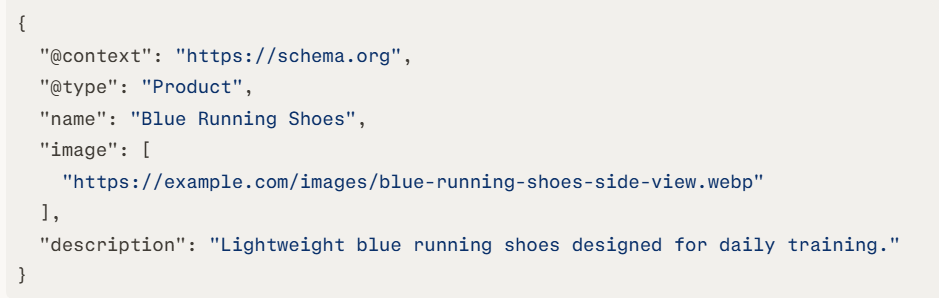
Step 10: Add Structured Data Where Relevant (e.g., Products, Recipes)
Structured data enables search engines to establish connections between your images and various rich results.
Product pages: Include product schema with the main product image.
Recipes and events and how-to content require their specific schema types which enable linking to suitable images.
Example (conceptual, simplified Product schema):
Step 11: Place Images Strategically in Your Content
The position of your images creates an impact on both the visitor experience and the measurement of their engagement with your content.
The first screen of your content needs an image because it breaks up text while it shows the content of your message.
The use of images in long-form content should occur at intervals of 300 to 500 words to keep the audience engaged throughout the piece.
The procedure requires you to position how-to screenshots directly beside the particular steps which they demonstrate instead of placing all screenshots at the bottom.
The article which you produce about image SEO requires these three elements for effective betterment.
An introductory graphic near the top summarizing “Resize → Compress → Describe → Serve Fast”.
You need to show screenshots of alt text fields in the section where you explain alt text.
You will need to present a before/after compression comparison image which shows how file size reduction works.
Step 12: Audit and Monitor Image Performance
Image SEO requires ongoing work through multiple audits which must occur at set intervals.
- The page speed tools PageSpeed Insights and GTmetrix and similar tools will help you detect which images cause delays on crucial website sections.
- The Core Web Vitals and page load metrics should be tracked to assess whether the image modifications lead to better performance results.
- The Google Search Console Performance Search type Image section will show you which photos and website content currently achieve both impressions and user clicks.
The examination of slow pages requires you to investigate their image content.
- The first question identifies whether the size of your image dimensions exceeds their required dimensions.
- The outdated format originates from using a huge PNG which could use JPG or WebP as suitable alternatives.
- The compression level exists between two extremes because it fails to compress material entirely.
The highest-traffic and highest-value pages require urgent repair work.
Summary and Next-Step CTA
The process of optimizing images to achieve faster rank advancements requires technical performance elements and clear contextual information to work together. You achieve this when you.
- You select images which match your content while being of high visual quality.
- You choose the display size as your actual dimensions for both format selection and resizing.
- You use compression techniques which result in no visible quality drop for the content.
- You create SEO-friendly file names which you pair with descriptive alt text development.
- You implement responsive images and lazy loading.
- You establish structured data while executing strategic image placement throughout your website.
- The process requires you to assess your system at regular intervals while you improve your current operations.
The process enables search engines to acquire complete visual comprehension, which results in user experience enhancements through faster content delivery.
Select a page from your existing blog content to evaluate according to this specific checklist. Optimize the images following the steps above, then re-test the page speed and track its rankings over the next few weeks. The same workflow will apply to your essential web pages after you achieve satisfying results.